The Mercku M2 is just another product that employs the principles of Mesh Wireless networking systems, allowing a greater area wise coverage, cost efficiency and overall ease of setup and usage. These types of systems employ the main Unit that basically works as the router, as in any other conventional router, the difference is a lot more in the appearance and a little bit in the broader principle. While most normal non-mesh routers employ antennae sticking out of the router, the mercku M2 has them installed inside the main pod making it more aesthetically pleasing to the eye.
Apart from the main pod, you will find miniature pods that have a basic plug and play function allowing you to easily expand the network access range. The nodes or smaller replicas that become a part of the mesh in the Mercku Mesh system, are referred to as bees and are expected to be sold individually, lest a user owns a house much larger than 4 nodes would support.
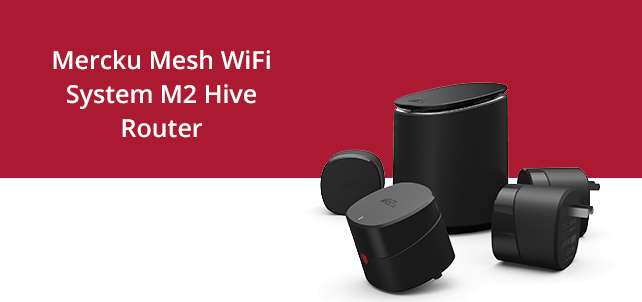
Mercku M2 hive setup via mywifi.merku.com
When you unbox the Mercku M2 hive, you will find the main pod, an ethernet cable, a supply cable, and 4 bees or nodes. Let’s just include the absent modem as a prerequisite. Once you are done unboxing move on to setting up your Mercku M2. There are two ways to set it up. You could either do it with your browser or download the Mercku app. For the former way, you will need to connect your computer to the internet via the ethernet cable and then log on to http://mywifi.mercku.com/. Once on it, follow the instructions to set up your admin ID and password.
The light on the queen tower will flash green after the setup is complete and that’s the cue that you are all set and good to go. You may also use the Mercku app to setup the main pod. All you have to do is download the app. Connect to the Mercku m2 hive wifi system and press the “Add Router” button and follow the given instructions and continue till the green flash cue.
You have successfully set up the main pod. Let’s move on to the bees. Choose a place in your home where you would want the network to be spread, plug the bee into a plug-in point and wait for it to automatically connect to the main node and flash a green signal. As soon aa that’s done, Voila, your mesh is set up and you have an evenly distributed network in places you need it the most.
Mercku M2 Light status
The light on the main pod has two color indicators, red and green. A steady red light signifies an absent connection while a blinking red indicates internal activity like setup or upgrade. The green steady light indicates a good connection while a blinking one lets you know that the mesh in a poor connection. What if you ever needed to reset the Mercku M2 hive? It is as easy as you would’ve expected. Here again, there are two ways to do it, manually and using the Mercku app.
For the former, just hold the reset button for at least five seconds until the light starts blinking red quickly For the latter, start the app, tap on the routers name and click on reset to factory setting and it should work fine. If you wanted to only restart the router, you could do it by accessing the app choosing the desired router, and clicking on the Reboot button and proceed to confirm. You may also visit the aforementioned webpage wherein you will find the same reboot option. Apart from that you could just pull out the plug and wait for a few seconds before you plugin.
How to update Mercku m2 firmware
You might generally want to be up to date with the firmware update patches of the Mercku M2 to experience peak performance. That’s simple as well. All you need to do is open up the Mercku app, go into settings, and find the update firmware option to download and install the updates. You will always be notified when there is an update so you don’t have to worry about missing out on any of them when they are officially released. The device’s light turns into a blinking red while updating and this also indicates that wifi will not be available until it turns green again. We would highly recommend you do not try to plug out or reset the router during this process as it may cause it to get damaged.
Mercku M2 Troubleshooting
Let’s address a few important but not to be worried about issues while using the Mercku M2. You may sometimes come across the green light blinking continually. You may need to reposition your router as the flashing green signal indicates that the router is not in a favorable position. Always see to it that your queen tower stays in a central location for optimal network distribution. You might also face the issue of the app displaying no internet access sign. In the event of that happening, please find your way to the settings on the app and select to set up the internet connection manually, select “Static IP”, fill in the information and follow further app instructions and it should be fine. If the problem persists, try rebooting the Mercku M2 and if no avail, do contact your internet service provider. Click here to download Mercku M2 hive Manual.
mercku m2 review
The Mercku M2 is a great device opening up the frontiers to the next generation of wifi routers where dead spots will no longer be a problem. You can finally bid farewell to the wall obstruction problem that continued to slow down your connection whenever a tad bit out of range. The Mercku M2 provides exceptional ease of usage and a pretty decent spread of network using its four included bees. When setting up in a perfect scenario, the Mercku M2 provides equally distributed, fine network across 5000 sq. feet, which is considerably far more than the range of any conventional antennae clad router.
You won’t regret setting up a Mercku M2 that provides a seamless browsing experience across your home. The CEO of Mercku M2 hive, in an interview with start.ca, shared that the bees will be sold individually later for those who would desire to increase the spread even more. He also stated that they would cost about 50 dollars each. Why not bring one home now?
Also Read:
MERCKU M6 802.11ax Router Installation, Setup, Firmware update
192.168.1.4 IP address
Google MESH Wi-Fi System Setup, Installation, Troubleshooting
Nighthawk WiFi 6 Mesh AX1800 4-Pack System
Apple HomePod Smart Speaker